Include variables in Markdown cells of JupyterLab Notebooks
Motivation: annotate your code with dynamic text
Think of creating a JupyterLab Notebook for a statistical analysis and wanting to share it, e.g. by publishing it on your blog. Often times you will add text to accompany your code by using Markdown cells. Now, imagine that you want to use some result from the code output in order to comment on it. Instead of doing this:
num_observations = 105
print("The data consists of {} observations".format(num_observations))
The data consists of 105 observations
It would not only be more concise but also better looking if you could include the value of num_observations in your text. Hence, your text would dynamically update when the variable value changes. This is a common feature and is supported by RStudio within R Markdown for example. Surprisingly, Jupyter Notebooks do not support the inclusion of variables in Markdown Cells out of the box. If you still use Jupyter Notebooks there is a readily solution: the Python Markdown extension. It is part of the nbextensions package which is easy to install and configure. However, JupyterLab users run out of luck because nbextensions is not compatible with JupyterLab anymore. But bear with me …
Solution: create text with Markdown from within code cells
Because I really wanted to use this feature for my blog posts I didn’t relinquish quite yet. After some research, I found and interesting answer on StackOverflow by the user @AS1. Turns out, you can create Markdown output in a Notebook from within a code cell like this:
from IPython.display import Markdown as md
# Instead of setting the cell to Markdown, create Markdown from withnin a code cell!
# We can just use python variable replacement syntax to make the text dynamic
md("The data consists of {} observations. Bla, Bla, ....".format(num_observations))
The data consists of 105 observations. Bla, Bla, ….
Nice! Still, there are two issues with this:
- The code cell is inconvenient to type in because the syntax is a bit cumbersome and there are no line breaks
- While the output is as expected the code cell (input) is also visible which kind of ruins the whole thing
Improving Solution: wrap lines and hide input cells
The first issue can be somewhat resolved by adding automatic line wrapping to code cells. Go to Settings -> Advanced Settings Editor in the left panel select Notebook and add the following to your User Preferences:
{
    "codeCellConfig":
    {
        "lineWrap": "on"
    }
}
The second issue is a bit more tricky to solve. If you just want to hide the code cell in your own Notebook, that’s easy: select the disruptive code cell and click View -> Collapse Selected Code. The cell is hidden and only the output remains creating a nice reading flow. Unfortunately, when exporting your Notebook this setting is ignored.
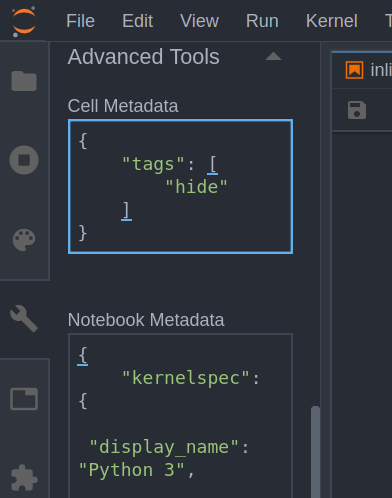
We can work around this problem by using some tricks. First, we need to add a tag to the input cell that bothers us. You can do this by selecting the Notebook Tools tab on the left and opening up Advanced Tools:

In the Cell Metadata box enter the following:
{
    "tags":
    ["hide"]
}
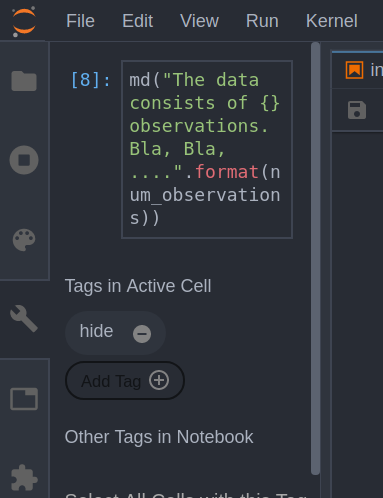
A more convenient way to add tags is using the JupyterLab extension jupyterlab-celltags
. You can install it by enabling Settings -> Enable Extension Manager (Experimental), selecting the Extension Manager form the left panel and searching for it. After enabling this extension you can simply add and edit your tags like here:

After we have successfully tagged our target cell we need to tell nbconvert (the utility which does any conversion from .ipynb to e.g. HTML in Jupyter) to ignore it. When converting from the command line we can do it like this:
jupyter nbconvert your_nb.ipynb --TagRemovePreprocessor.remove_input_tags='{"hide"}'
This will export your Notebook to HTML (the default) in the same folder and remove all input cells tagged with hide. Mission accomplished! Your result should now look like this:
The data consists of 105 observations. Bla, Bla, ….
Generalizing solution: apply to JupyterLab export and static site generators
If you prefer to export your Notebook via JupyterLab and File -> Export Notebook as ... you need to add our change to the config file. For this, create / edit the file ~/.jupyter/jupyter_notebook_config.py residing in your home folder. At the bottom of the file add this:
c.TagRemovePreprocessor.remove_input_tags = {"hide"}
After restarting JupyterLab and exporting your file, it should give you the desired result as well.
Finally, let’s see how we can get this to work with a static site generator like Pelican which I use for this blog. In Pelican, you can write whole blog posts using only Jupyter Notebooks which is fantastic for sharing your analysis in a super convenient way. For that, you need a plugin that can convert your Notebook and make it work with Pelican. The one I prefer is ipynb2pelican. There are a few others which work pretty much the same: they all use nbconvert to turn your .ipynb file to a HTML file that fits the styles of your template.
Because ipynb2pelican uses a modified preprocessor of nbconvert we need to explicitly set our configuration for this utility. In this case, we need to edit /pelican/base/folder/plugins/ipynb2pelian/preprocess.py. First, add the following line to the import headers:
from nbconvert.preprocessors import TagRemovePreprocessor
Then, add the following line inside the config_pres() function:
TagRemovePreprocessor.remove_input_tags = {"hide"}
After that, when ipynb2pelican calls nbconvert it will respect our setting. Done!
If your situation is different, e.g. you use a different Pelican plugin or even a different site generator look for the .py file which contains this import:
from nbconvert.preprocessors import Preprocessor
Adjust the file in the same manner as described above.
Now, you know how to include variables in your Jupyter Notebook’s Markdown cells. In addition, you learned how to selectively hide input cells when converting your notebook, e.g. for sharing it on your blog.